Drwabacks of Speech to Text Recogniser for Continuous Speech Android
A speech-to-text feature turns your voice into text, and a text-to-speech feature reads the text out loud. By adding this feature, users can interact with your app via voice (in addition to user gestures), enhancing the user experience. This can help you build, in essence, a Google assistant-like app.
The way it works is that you say something or ask the app something, and the app processes your request and then speaks the result.
In this tutorial, we'll build an example using the speech recognition and text-to-speech plugin.
We'll go through a step-by-step process for the example that gives you a base for building a voice assistant app. We'll also cover cases not handled by the plugin by default, such as continuous listening on Android devices.
Here's how it looks when completed:

Here's what we are going to cover in this tutorial:
- Adding speech-to-text in a Flutter app
- Adding text-to-speech in a Flutter app
- Enabling continuous listening on Android
Adding speech-to-text in a Flutter app
In the example app, when a user taps on the mic button, the app starts to listen. As the user begins speaking, the voice is converted into text and displayed on the screen. Users can stop the listening service by clicking on the stop button.
You can implement such a requirement by utilizing the speech recognition plugin. Internally, it uses Speech API for iOS and SpeechRecognizer for Android. It allows you to add speech recognition for any locale with devices supporting iOS10+ and Android 4.1+.
This plugin offers several helpful methods that you can use to start, stop, and cancel the listening.
Here are the step-by-step instructions on adding the speech-to-text support in Flutter.
Step 1: Adding dependencies
The very first step starts with adding dependency inside the pubspec.yaml file.
The contents inside the pubspec.yaml file shoud look like this:
dependencies: flutter: sdk: flutter cupertino_icons: ^1.0.2 speech_recognition: ^0.3.0+1 #NEW
Step 2: Adding permissions
For the plugin to record audio, you need to give permission for both the Android and iOS platform. For this, you can update the platform-specific files.
For Android
Locate the AndroidManifest.xml file at the your_project/android/app/src/main/AndroidManifest.xml and update the file as follows:
<manifest xmlns:android="http://schemas.android.com/apk/res/android" package="com.example.speech_to_text_demo"> <!-- 1. Permission --> <uses-permission android:name="android.permission.RECORD_AUDIO" /> <!-- 2. To overcome bind to recognition service failed issue --> <queries> <package android:name="com.google.android.googlequicksearchbox"/> </queries> <application android:label="speech_to_text_demo" android:name="${applicationName}" android:icon="@mipmap/ic_launcher"> <activity android:name=".MainActivity" android:exported="true" android:launchMode="singleTop" android:theme="@style/LaunchTheme" android:configChanges="orientation|keyboardHidden|keyboard|screenSize|smallestScreenSize|locale|layoutDirection|fontScale|screenLayout|density|uiMode" android:hardwareAccelerated="true" android:windowSoftInputMode="adjustResize"> </application> </manifest> Here's what is going on in the code above:
- Adding
android.permission.RECORD_AUDIOto record audio - This helps you fix the "bind to recognition service failed issue" on some Android devices.
For iOS
Locate the info.plist file at the your_project/ios/Runner/info.plist and add the following permissions:
<key>NSMicrophoneUsageDescription</key> <string>This application needs to access your microphone</string> <key>NSSpeechRecognitionUsageDescription</key> <string>This application needs the speech recognition permission</string>
(Note: Above permissions will show a message to the user before starting the speech recognition)
Step 3: Adding required variables
In this step, you will add variables that are required to maintain the app state. For example, You must need a variable to know whether the speech recognition is started. These will be useful for showing and hiding widgets based on various situations.
Here are some vital variables that you need:
// 1. late SpeechRecognition _speech; // 2. bool _isSpeechStarted = false; // 3. bool _isListening = false; // 4. String transcription = ''; String currentText = ''; // 5. bool _isEndOfSpeech = false;
- This will be used to create the instance of
SpeechRecognitionand later access it to start and stop listening - This will be used to show/hide the mic and stop buttons
- This will be used to show/hide 'Listening…' text. Although we can use the previous variable (i.e
_isSpeechStarted), this variable is helpful to know if user is actually speaking - This is to know that the speech recognition has stopped
Step 4: Building the page UI
The page UI consists of the two main sections. The first section displays the conversation between the voice assistant and the user; and the second section displays the area to start and stop speech recognition.
Here's what the bare minimum code looks like for this:
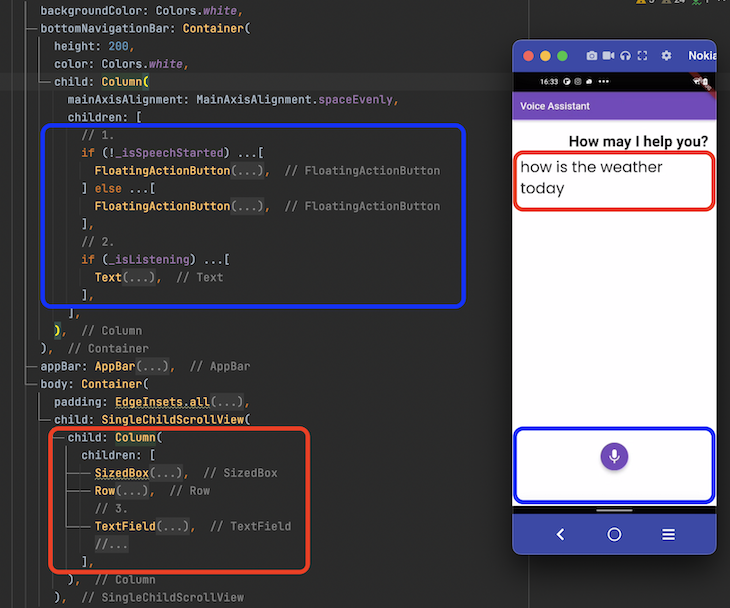
SafeArea( child: Scaffold( backgroundColor: Colors.white, bottomNavigationBar: Container( height: 200, color: Colors.white, child: Column( mainAxisAlignment: MainAxisAlignment.spaceEvenly, children: [ // 1. <-- SEE HERE if (!_isSpeechStarted) ...[ FloatingActionButton( backgroundColor: const Color(0xff764abc), child: Icon( Icons.mic, size: 35, ), onPressed: () { _startSpeechRecognition(); }, ), ] else ...[ FloatingActionButton( backgroundColor: const Color(0xff764abc), child: Icon( Icons.stop, size: 35, ), onPressed: () { _stopSpeechRecognition(); }, ), ], // 2. <-- SEE HERE if (_isListening) ...[ Text( kListening, style: GoogleFonts.nunito( textStyle: TextStyle(color: Colors.black, fontSize: 22.5)), ), ], ], ), ), appBar: AppBar( title: Text('Voice Assistant'), backgroundColor: const Color(0xff764abc), ), body: Container( padding: EdgeInsets.all(16), child: SingleChildScrollView( child: Column( children: [ SizedBox( height: 10, ), Row( mainAxisAlignment: MainAxisAlignment.end, children: [ Text( _ttsGreet, style: GoogleFonts.poppins( textStyle: TextStyle( fontSize: 30.5, fontWeight: FontWeight.bold), ), ), ], ), // 3. <-- SEE HERE TextField( controller: _myController, readOnly: true, onChanged: (String text) { setState(() { _isContentsPresent = text.isNotEmpty; }); }, //focusNode: _nodeText1, cursorColor: Colors.grey, style: GoogleFonts.poppins(textStyle: TextStyle(fontSize: 30.5)), keyboardType: TextInputType.multiline, maxLines: null, decoration: InputDecoration( border: InputBorder.none, hintStyle: GoogleFonts.nunito(), ), ), ], ), ), ), ), ); Here's quick rundown of the code above:
- This part contains two FloatingActionButtons; one to start speech recognition and another one to stop. But, only one is displayed based on the
_isSpeechStartedvariable - This is used to show/hide the 'Listening…' text
- The speech-to-text result (actual user voice command) is displayed here. Here,
TextFieldwidget is used instead of theTextwidget to enable users edit the voice command (if required)
Here's how to code translated into the design:
Step 5: Adding speech recognition methods
After setting up the variables and page UI, it's time to call the plugin methods that are responsible for driving the speech recognition feature.
Below are some of the important methods that you will use to start and stop the recognition service.
// 1. void _activateSpeechRecognizer() { _requestPermission(); _speech = new SpeechRecognition(); _speech.setAvailabilityHandler(onSpeechAvailability); _speech.setRecognitionStartedHandler(onRecognitionStarted); _speech.setRecognitionResultHandler(onRecognitionResult); _speech.setRecognitionCompleteHandler(onRecognitionComplete); _speech .activate() .then((res) => setState(() => _speechRecognitionAvailable = res)); } // 2. void onRecognitionResult(String text) { if (_isEndOfSpeech) { _isEndOfSpeech = false; return; } setState(() { transcription = text; _isListening = true; print('recognized text is- $transcription'); _myController.text = transcription; _myController.selection = TextSelection.fromPosition( TextPosition(offset: _myController.text.length)); }); } // 3. void onRecognitionComplete() { print('Recognition Completed'); if (transcription.isNotEmpty) { _isContentsPresent = true; _processRequest(transcription); _toggleSpeechRecognitionStatus(isSpeechStarted: false); } } - This activates the speech recognizer in the background. This must be called as soon as the page is loaded
- This outputs the recognition result on the
TextFieldwidget - This will be called when the user is done providing the voice command. Here you can grab the transcription (voice converted to text) and perform the business logic or whatever you want to do with the transcription
Awesome! you now know how to add speech-to-text support. Let's assume you have processed the request and its time to speak out the result. Let's see take a look at how to do that.
Adding text-to-speech in a Flutter app
In the example app, after displaying the user's voice command on-screen, the voice command is processed and the result is read out by the voice assistant (in addition to displaying it on screen).
You can implement such a requirement by utilizing the text to speech (TTS) plugin. It works on iOS, Android, web, and macOS. With this plugin, you can also change Volume, Rate, and Pitch of the voice.
Here are the step-by-step instructions for adding the text-to-speech support:
Step 1: Adding dependencies
Add the text to speech dependency inside the pubspec.yaml file.
The contents inside the pubspec.yaml file should look like this:
dependencies: flutter: sdk: flutter cupertino_icons: ^1.0.2 speech_recognition: ^0.3.0+1 text_to_speech: #NEW
Step 2: Adding permissions
For the plugin to speak out the text, you only need to enable the permission for the Android platform.
Here what the AndroidManifest.xml (located at your_project/android/app/src/main/AndroidManifest.xml) file should look like:
<manifest xmlns:android="http://schemas.android.com/apk/res/android" package="com.example.speech_to_text_demo"> <queries> <package android:name="com.google.android.googlequicksearchbox"/> <intent> <action android:name="android.intent.action.TTS_SERVICE" /> </intent> </queries> <application </application> </manifest>
Step 3: Adding required variables
In this step, you will add variables that are required to start and pass the message to the TTS (text-to-speech) service.
Here are some variables that you need:
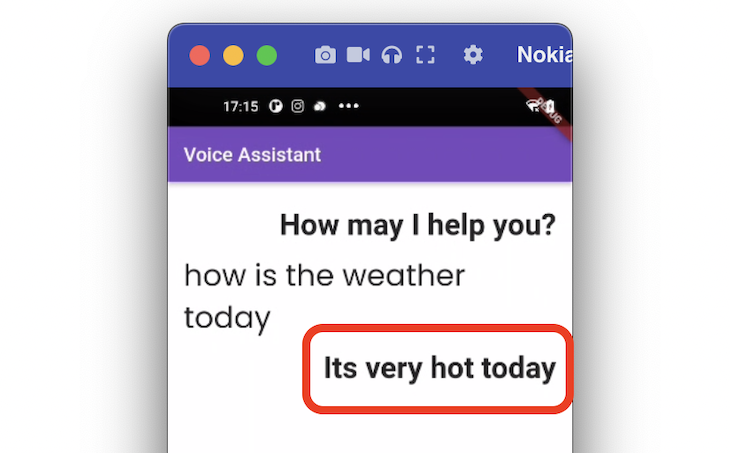
// 1. TextToSpeech tts = TextToSpeech(); // 2. String _ttsGreet = 'How may I help you?'; // 3. String _ttsStaticResult = 'Its very hot today';
- This will create the intance of
TextToSpeech, which you can use to trigger the TTS service - This is greeting message shown after the page is loaded
- This to show and speak out a dummy message
Step 4: Building the page UI
The page UI simply shows a greeting message and a message answering the user's query in a text widget (below the user query).
For the sake of simplicity, the page UI is kept simple. You can extend this and use ListView to build flexible UI that best matches your requirement.
The code looks like this:
if (_isShowResult) Row( mainAxisAlignment: MainAxisAlignment.end, children: [ Text( _ttsStaticResult, //textAlign: TextAlign.end, style: GoogleFonts.poppins( textStyle: TextStyle( fontSize: 30.5, fontWeight: FontWeight.bold), ), ), ], ),
Step 5: Adding text
If you have set up the variables and page UI, you can trigger the speech after processing the user query by calling the speak() method on the instance of the TextToSpeech.
Here's how you do it:
_processRequest(String transcription) { // Process request here /// Your business logic here //Speak out the result setState(() { _isShowResult = true; }); _tts(_ttsStaticResult); } _tts(String message) { tts.speak(message); //<-- SEE HERE } Congratulations! now you know how to add text-to-speech support.
Enabling continuous listening on Android
When you run the app with the speech recognition plugin, you will likely find that the speech recognition in Android behaves slightly different to iOS.
In Android, when you start the service and don't speak for a moment, the system automatically stops listening (which is not the case in iOS).
Technically, it should keep the service open until the user starts speaking — the plugin doesn't have a solution for this at the moment, so I'll explain how to fix it yourself.
Steps to enable the continuous listening on Android are as follows:
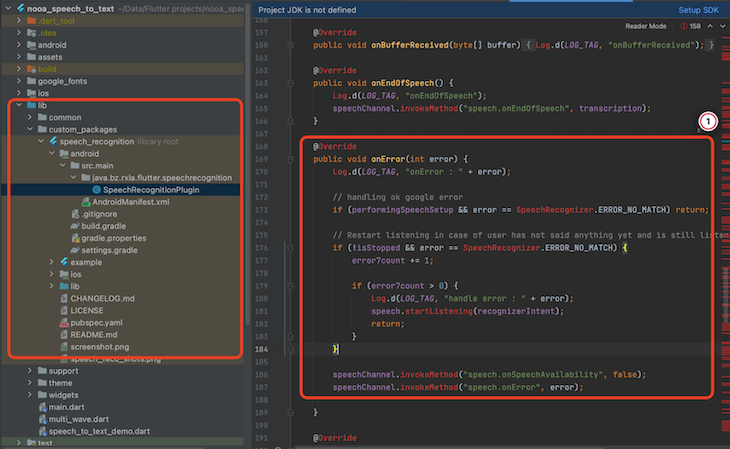
- Download the plugin code and place it inside the lib/custom_package folder
- Open the
SpeechRecognitionPluginfile at lib/custompackage/packagefolder/android/src/main/java/bz/rxla/flutter/speechrecognition. - Replace the onError method with the following code
@Override public void onError(int error) { Log.d(LOG_TAG, "onError : " + error); // handling ok google error if (performingSpeechSetup && error == SpeechRecognizer.ERROR_NO_MATCH) return; // Restart listening in case of user has not said anything yet and is still listening i.e not stopped by user if (!isStopped && error == SpeechRecognizer.ERROR_NO_MATCH) { error7count += 1; if (error7count > 0) { Log.d(LOG_TAG, "handle error : " + error); speech.startListening(recognizerIntent); return; } } speechChannel.invokeMethod("speech.onSpeechAvailability", false); speechChannel.invokeMethod("speech.onError", error); } The idea here is to restart the speech recognition when it encounters the SpeechRecognizer.ERROR_NO_MATCH error (that pops up when the service is stopped automatically).
After making changes as per the above code, the speech recognition service will keep running as long as the user manually stops it (which is what we want).
Here's what it looks like:
The full source code can be found here.
Conclusion
Adding speech-to-text and text-to-speech features offers the chance to provide additional capability to for users interact with your app.
In this tutorial, we first looked at the how to add speech-to-text and then explored adding the text-to-speech service.
We went through step-by-step instructions in setting up the variables, UI, and methods. We also learned how to enable the continuous listening for Android devices.
LogRocket: Full visibility into your web and mobile apps

LogRocket is a frontend application monitoring solution that lets you replay problems as if they happened in your own browser. Instead of guessing why errors happen, or asking users for screenshots and log dumps, LogRocket lets you replay the session to quickly understand what went wrong. It works perfectly with any app, regardless of framework, and has plugins to log additional context from Redux, Vuex, and @ngrx/store.
In addition to logging Redux actions and state, LogRocket records console logs, JavaScript errors, stacktraces, network requests/responses with headers + bodies, browser metadata, and custom logs. It also instruments the DOM to record the HTML and CSS on the page, recreating pixel-perfect videos of even the most complex single-page and mobile apps.
Try it for free.
Source: https://blog.logrocket.com/adding-speech-to-text-text-to-speech-support-flutter-app/
0 Response to "Drwabacks of Speech to Text Recogniser for Continuous Speech Android"
Post a Comment